Sunday, June 30, 2013

Seared Salmon with One-Pan Sauce


There is something almost decadent about a nice, thick piece of salmon.  It boasts a bold, unique flavor, and its meaty texture makes it well liked even by people who usually do not care for fish.  Honestly, I put it up there with a nice rare fillet mignon in pure pleasure to eat but without the price tag and tons of omega-3's!

I used to be intimidated by the thought of preparing fish (cake baking too but that's another story).  I now realize that I couldn't have been more foolish in my fear.  Salmon's flavor stands on its own so well that keeping the seasoning simple is not just less intimidating  but yields the best results!   It can easily get thrown on a grill or broiled, but my absolute favorite (and probably easiest method) is to pan sear it in butter and garlic.

Remember it's almost impossible to have too much minced garlic! 

A unique beauty of pan searing is that you can quickly prepare a simple pan sauce, with the drippings, in the same butter--no waste and a power punch of flavor.  I keep with the simplicity and serve my salmon with veggies roasted in olive oil, salt and garlic (yes I am an addict) a bit of french bread and voila! gourmet meal in minutes and your tastebuds are doing a happy dance! 

Ingredients: 

  • 2 salmon fillets (about 6 ounces, but size and quantity are easily altered, though I wouldn't crowd your pan with more than 3 fillets at a time)
  • 2-3 TBL minced garlic (or about 5 cloves if self mincing) 
  • 3-4 TBL butter 
  • Fresh or dried herb of choice to taste (Rosemary or thyme work the best)
  • 1/2 cup white white
  • 1/4 cup balsamic vinegar (white or traditional dark) 
  • salt/pepper
Season your fillets with salt and cracked black pepper.  Melt butter in a pan on medium.  Add garlic.  Turn heat to medium high.  Add fillets flesh side down as the butter starts to sizzle more vigorously. 

Cook the salmon for about 4-5 minutes for medium/medium well.  Flip to skin side and continue to cook for about 2 minutes.  
My garlic got a little dark because I cooked it a tad much before adding salmon, but it was still fabulous! 

Remove salmon and set aside on a plate and tent with foil.  Add white wine to the pan.  Lower heat to medium.  Add balsamic and any desired herbs.  Cook quickly, stirring constantly.  If the sauce stops sizzling then turn up the heat a bit, but beware about burning your garlic.  

Cook for about 3-4 minutes until it starts to thicken.   


TIP:  This type of sauce will continue to thicken while it is cooling, so don't cook it until it is the thickness you think the end result should be; otherwise it will become chewy caramel when it's cool (speaking from experience here).

Drizzle sauce over your salmon and serve immediately with veggies, bread and, of course, wine.  
My hubby had white wine, but salmon is a fish that is nicely complemented by a light red equally as well.  Bon Appetit! 


Friday, June 28, 2013

Two Rainbow Salads

Roasted Rainbow Salad

I love salad. Really.

For many, the word "salad" conjures up some pretty depressing images: a bowl full of iceberg lettuce, topped with shredded cheese product, croutons that could break your teeth, and a sliver or two of underripe, out-of-season tomatoes grown in the thankless sands of Florida. Drown the whole thing in a bottled dressing, and voila! A perfect recipe for bad PR.

Salad is so much more than that, my friends.


Raw rainbow salad

I don't believe in labeling foods "good" or "bad," "sinless" or "sinful" (don't get me started on that hideous, theologically suspect cliche), but I admit that, yes, part of the pleasure of eating a salad is feeling (if we must use this phrase) "virtuous"-- feeling like you've done something good for your body. But feeling virtuous isn't the same as feeling martyred. Being good to your body should be a pleasurable experience, and I never eat a salad I don't enjoy.

These two summer salads are not only tasty; they are also very pleasant to look at, featuring as they do fresh produce from every stop on the color wheel. Kermit would be proud.

Roasted Rainbow Salad


There's so much going on in this gorgeous salad. Roasted carrots and squash give sweetness, blueberries add tang, and beans contribute some creaminess, while fresh lemon juice and good tomatoes lend acidity and tartness. I love the way the warm vegetables contrast with the cold lettuce leaves.

Ingredients


2 medium to large carrots
1 small yellow summer squash (I usually shoot for about 6 ounces)
1 tsp olive oil (or a little more if you want)
~2 cups mixed greens (I like a mix that has lots of green [spinach, mizuna,  tatsoi, romaine, arugula,
       green tango], purple [red oak lettuce, red mustard,  lolla rosa lettuce, red leaf lettuce], and pink
       [baby Swiss chard])
1/2 cup pinto beans (or whatever beans you like and have on hand)
1/2 cup blueberries
3/4 cup chopped tomato (or sliced cherry tomatoes)
1 Tbsp lemon juice
Red wine vinegar to taste
Salt
Pepper

Directions


Preheat oven to ~425 degrees. Chop carrots and squash into bite-sized chunks. Toss in a roasting pan with the olive oil, and roast for about 30 minutes, tossing once, or until beautifully blistered and browned.


Make sure to spread the veggies evenly in the pan; otherwise those suckers will steam, not roast.

Put mixed greens, beans, blueberries, tomatoes, and roasted carrots and squash in a bowl. Season with salt and pepper, add lemon juice and vinegar, and toss. Spend the rest of your meal trying to get a little bit of everything onto every forkful.


The perfect bite.

Raw Rainbow Salad


This salad is just as pretty and delicious as the roasted rainbow salad, but without having to turn on the oven. The raw rainbow salad features peaches and blueberries for sweetness, carrots for crunch, broccoli for heft, and diced red onion for a pop of slap-in-the-face flavor.

Ingredients


~2 cups whatever kind of greens you want-- I like mixed greens or arugula
1 peach, chopped (I like to get the kind with a really red skin)
1 carrot, scrubbed and finely chopped
1 cup chopped broccoli
1/2 cup blueberries
1/2 cup whatever kind of beans you want
1/4 cup chopped red onion
1 Tbsp lemon juice
Vinegar to taste (either red wine or apple cider is fine)
Salt
Pepper

Directions


Toss everything in a bowl. Eat it. Rocket science, I know.

Monday, June 24, 2013

Tres Chic Tres Leches Cake

When I look at this picture, I'm torn by two desires: 1. my desire to smooth out the slightly messy whipped cream, and 2. my desire to attack that thing with a fork.

Our good friend Patricia recently came into town for my brother's wedding, which happened to coincide with her birthday.

To honor the occassion, I decided to try something I've never made before-- and, in fact, never tasted before: a tres leches cake.


"Tres leches" is Spanish for "three milks." A tres leches cake is a sponge cake that gets pierced with a fork...


...like so...
...and doused in three milks: evaporated milk, condensed milk, and heavy whipping cream.


Okay, so this photo is shaky. You try tilting a 4-cup measure in one hand while taking a picture with the other.

Then you let the milked-up cake sit in the fridge for two days, which makes this a nice make-ahead dessert. When the two days are up, you whip some more cream and frost that sucker, then top with fresh fruit.

In retrospect those peaches look a little off-center to me. Yes, I'm obsessing. No, I don't have a problem with that.

The end result is a rich, sweet dessert, damp but not soggy, that tastes more like a pudding than a cake. All of my comrades in this gustatory expedition agreed that the cake was delicious. I thought so, too, although I wondered what a teaspoon or two of vanilla might do to add a litttle more depth of flavor.


Tres Chic Tres Leches Cake


From The Lady Had Seconds

Ingredients


1 1/2 cups sugar
8 tablespoons butter, room temperature
6 eggs
1 3/4 cups all-purpose flour
1 1/2 teaspoons baking powder
1/4 tsp salt
1 can (12 oz.) evaporated milk
1 can (14 oz.) condensed milk
My add-in: 1 tsp vanilla
2 cups whipping cream, divided
Assorted tropical fruit (mango, pineapple, starfruit, coconut) as garnish (Or just use whatever in-season fruit you like...we used peaches and blueberries)

Directions


Beat sugar and butter in large bowl until fluffy; beat in eggs, one at a time, beating well after each addition. (I guess this is the part where I'd add the vanilla if I were to do this again.) Mix in combined flour, baking powder, and salt. Pour batter in greased and floured 9-inch springform pan.

Bake at 350 degrees until cake is golden and toothpick inserted in center comes out clean, 55 to 60 minutes.

About 5 minutes before cake is done, combine milks and 1 cup whipping cream in a 4-cup glass measure. Immediately after removing cake from oven, pierce cake with long-tined fork or skewer and pour milk mixture over it; cool. Refrigerate, tightly covered with aluminum foil, for 2 days.

Remove side of springform pan; place cake on serving plate. Whip remaining 1 cup whipping cream to stiff peaks and spread over top of cake. Garnish with fruit; spoon additional fruit over each slice if desired. Cake can be refrigerated up to 6 days.

Happy Birthday, Patricia!


Sunday, June 23, 2013

Classic Buttermilk Pancakes

Who doesn't love the special treat of warm buttermilk pancakes drenched in maple syrup and rich butter?  Well, in my household such pancakes are not exactly a treat---I make them from scratch several times a week for my four- and 1 year-old in place of stuffing mass-produced breakfast cereal down their throats. How can homemade pan bread sans preservatives be any worse than food from a box that doesn't expire for 2 years?

I treat pancakes like any baking endeavor: follow the directions in the strictest manner possible.  Even though I have been baking, quite successfully I might add, for over four years, I know that half the trick is finding a good recipe and repeating it to the point of perfection and being extra-diligent in following instructions including any learned adaptations.

Right when I started really taking baking seriously four years ago, I got a kitchen scale.  I will never go back to measuring cups--especially when it comes to flour.  If you want on-the-mark perfection when you bake, weighing your flour is a must! 

One thing to always remember with pancakes is not to over mix.  Otherwise you will develop the gluten in the flour and yield a more dense and chewier pancake than the desired airy, fluffy texture that we all love. A quick learning point I have found with pancakes is that not to "over-mix" does not necessarily mean to mix "over-gentle."  

You want all the flour to dissolve into the liquid, which cannot be achieved with over-gentle mixing.  Dissolving all the flour does not mean there shouldn't be lumps.  Remember, clumps are not lumps!  Because the butter is added last, there is plenty of time to ensure that no raw flour is visible or stuck on the bottom.  Just remember that mixing shouldn't exceed about  20 strokes or so, but don't make those few strokes so weak that flour gets trapped on the sides or bottom (I speak from experience here).  Keep those strokes firm! 

Ingredients: 
9 oz. Flour*
3 TBL Sugar
2 1/2 TSP Baking Powder
1 TSP Baking Soda 
3/4 TSP Salt (Preferably Kosher) 
2 cups Buttermilk
2 large eggs
3 TBL butter, melted and slightly cooled

*There are approximately 4 1/4-4 1/2 ounces of flour in a cup.  If you use a measure cup spoon the flour into the measuring cup so that it does not pack down too much.  

Whisk all dry ingredients together.  Whisk buttermilk and eggs together.  Without over-mixing, whisk dry ingredients with combined buttermilk and eggs.  Just before it is completely mixed, add slightly cooled, melted butter.  Whisk until completely combined.  Let rest while the skillet is heating.  

Heat a skillet on medium high heat (or if you are fancy heat an electric griddle to 350 degrees).  Heat until water instantly dances into oblivion and spoon roughly 1/4 cup scoops of rested batter.  Cook until the edges bubble and firm and flip for approximately 2 minutes.  

You may not be fancy or organic but if anything else, splurge on a 100% maple syrup.  Your pancakes will thank you.  


Restaurant Speed Date: Cafe B's

I'm calling this a "speed date" because it's based off of one meal and one visit, so it's not comprehensive enough to be a full-out restaurant review. Also possibly because buzzwords both corporate and pedagogical have leaked into my brain and rooted there like a horde of flesh-eating bacteria.

Cafe B's is a Brennan's restaurant on Metairie Road. The place is upscale-casual, the decor chic and not too aggressively nautical. Average dinner entree price: ~$24. An early-bird special (called, to this diner's mild chagrin, the "b4 Sunset Menu") offers three courses for $18.50 from 5-6:15 nightly.

Appetizer: Crispy Panko Eggplant Sticks

These freshly fried eggplant sticks may have been my favorite thing on our menu.


The coating was crispy (as advertized) with a very light dusting of parmesan, and the tubes of eggplant were almost liquid in their tenderness. The smoked papriki aioli was both tangy and peppy, its coolness a nice contrast to the hot eggplant sticks.


I liked it so much, I'll give you two photos.

First Course: Corn and Crab Bisque


This decent-enough soup improved as it cooled, and while it's hard for me to pinpoint anything wrong with the bisque, it's also hard for me to point out anything exceptional about it. It was good; just not outstanding. Perhaps it could have used just a touch more heat?

Main Courses:


Bronzed Salmon


Citrus butter added some sweetness and zing to a moist, flaky slab of rare-cooked salmon. This is one of the best servings of salmon I've ever had; one of my dining companions said it rivaled salmon he'd eaten in San Francisco. The spaghetti squash did nothing for me, but then, spaghetti squash never does. Cubed zucchini and eggplant were a nice accompaniment.

Garlic Shrimp Linguine

My comrades in this gustatory enterprise ordered the garlic shrimp linguine. The shrimp were excellent, but for me this dish was most notable for its other ingredients: olive oil, garlic, tomato, and, especially, pesto. The pasta carried just the right amount of basil flavor.

Dessert: Warm Whiskey Bread Pudding


Where do I begin with this thing? The custardy, raisin-studded innards? The slightly crispy sugar-coated crusts? The warm, gently sweet, thoroughly complementary but not overpowering whiskey sauce? Or the way the whole shebang comes together with a spoonful of whipped cream? Hoo boy.

Bottom Line

If you're looking for a laidback version of fine dining and are willing to pay for it, Cafe B's is a great option.

Atmosphere: Informal affluence with a Gulf Coast vibe
Cost: A little pricey
Food: Excellent
Service: No complaints
Kid-Friendly: Kids' Menu available
Veg-Friendly: Many pescetarian options, vegetarian options created on request
Would I go back: Yes, if I had the money and wanted to splurge


Saturday, June 22, 2013

Aunt Katie's Stuffed Tomatoes

You know a recipe is good when it comes handwritten on an index card covered in greasespots.


Sometimes the scruffiest things are the best things.

My mother learned how to cook from her Italian aunt-in-law, who learned how to cook from her French mother-in-law. Hence these stuffed Creole tomatoes.

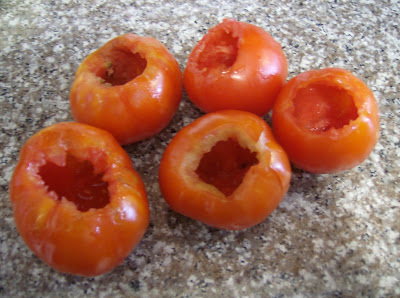
What is a Creole tomato, you ask?


Tomatoes in an existential crisis. "I feel so empty inside!"
A Creole tomato is any variety of tomato grown in Louisiana. I don't know the science, but apparently Louisiana has special soil that produces extra-flavorful tomatoes. A real Creole is covered in splits and crags. That's how you know it's a good one.


Before bread crumbs
After bread crumbs


Unfortunately, and for reasons unbeknownst to me, it's hard to find those big, ugly, beautiful Creoles anymore. The Creoles at the market today are more proportional and less tasty. Still good, but not the same. Whatever happened to those ugly, delicious Creoles? We'll have to get Poppy Tooker on the case.

Agricultural mysteries aside, these stuffed tomatoes are I-spend-all-year-dreaming-about-June good. Plus, they freeze beautifully. 

Where did this saliva all over my keyboard come from? Oh, that's right-- my mouth.

Recipe: Stuffed Creole Tomatoes


Ingredients


6 tomatoes
1 onion, chopped
3 cloves garlic, minced
2 green onions, chopped
parsley
1/2-1 hot pepper, chopped (or a pinch of cayenne)
1 1/2 cups bread crumbs
ham seasoning (or not, if you're a pescetarian like me...they're also delicious sans animaux)

Scoop pulp out of tomatoes and set in a bowl. Fry onion in cooking oil until brown. Then add ham (if using), green onion, garlic, and pepper. Cook until all browns. Add tomato pulp and cook for about 10 minutes. Let boil and add salt. Add about 1 1/2 cups of bread crumbs. Mixture should have a pasty consistency. Cook for a while. Turn off fire, add parsley, and mix well.

Fill tomato shells with mixture. Top with bread crumbs and a pat of butter. Place in foil-lined pan Do not place in a foil-lined pan! Aunt Katie didn't know it, but acid and aluminum do not mix. Place in a pan and bake at 450 degrees until bread crumbs brown.


Wednesday, June 19, 2013

Vegetable Lasagna

These lasagnas are beautiful the way Jackson Pollack paintings are beautiful.


You're looking at five square inches of delectable chaos.


The original recipe calls for six individual mini-lasagnas baked in ramekins. That sounds adorable and all, but...meh. I just made a regular 9x13 lasagna. Of course, when I sliced into the finished product and saw my lasagna square collapse into a veggie lava on my plate, I began to appreciate the wisdom of the ramekins after all.

Even so, part of me likes the un-neatness of this recipe. Part of me likes the way the carrots, summer squash, asparagus, and white beans escape the confines of the pasta sheets and show their beautiful selves to the world-- like, "We're comin' out, we want the world to know, got to let it show." Like, "We're, too sexy for these noodles, too sexy for these noodles."

This lasagna is as hearty and filling as one expects a lasagna to be, but the vegetables give the dish a light, clean taste. Despite featuring my favorite go-to marinara sauce (see below), the tomato flavor isn't as strong as I would like, so I sprinkled some oil-packed sun-dried tomatoes over the spinach layer for extra zip. Next time I'd probably add even more.

Tomato is to me as cowbell is to Christopher Walken.


Recipe: Vegetable Lasagna

Adapted from Giada De Laurentis' Individual Vegetable Lasagnas


Ingredients


3 tablespoons extra-virgin olive oil
1 medium yellow onion, finely chopped
1 medium carrot, finely chopped
1 medium zucchini, finely chopped
1 medium summer squash, finely chopped
8 asparagus spears, cut into 1/4- in. slices
1 pound lasagna sheets
2 cups tomato sauce, recipe follows
1 can white beans, rinsed and drained
2 (10-oz.) packages frozen chopped spinach, thawed and squeezed dry
Oil-packed sun-dried tomatoes, drained-- as many as you want
3 cups shredded mozzarella
1/2 cup freshly grated Parmesan
3 tablespoons unsalted butter, halved
Salt and freshly ground pepper

Directions


Preheat oven to 375 degrees.

In a saute pan over medium heat, add extra-virgin olive oil. When almost smoking, add the onion and cook until soft, about 5 minutes. Add the carrot and cook for 3 minutes. Add the zucchini and squash; cook for 5 minutes. Add asparagus and cook for 2 minutes. Remove from heat when all vegetables are completely cooked but still have a good crunch. Allow to cool.

Boil and drain lasagna noodles according to package directions. Spread some tomato sauce over the bottom of a 9x13 pan.Layer the lasagna sheets, overlapping slightly, over the tomato sauce; I used about five sheets per layer.

Rinse the beans with water and season with salt and pepper. Spread the beans over the noodles. Spread the spinach on top of the beans.  Sprinkle sun-dried tomatoes over spinach. Place another layer of pasta over the tomatoes and press down gently. Spread sauteed vegetables over pasta layer. Spread 1 cup of tomato sauce over sauteed vegetables. Place third layer of pasta over tomato sauce. Spread second cup of tomato sauce over pasta layer. Sprinkle with mozzarella and Parmesan cheeses. Top with butter. Bake in oven for 20 minutes or until brown and bubbling (it took us a little longer).


Recipe: Go-To Marinara Sauce


Ingredients


2 tablespoons extra-virgin olive oil (The original recipe calls for 1/2 cup, but I find that two tablespoons is plenty. Just depends on how oily you want the finished product to be.)
1 small onion, chopped
2 cloves garlic, chopped
1 stalk celery, chopped
1 carrot, chopped
Salt and pepper
2 (32-ounce) cans crushed tomatoes (If you can't find 32-ounce cans, 28-ounce will do)
2 dried bay leaves
4 tablespoons unsalted butter (optional)

Directions


In a large casserole pot or Dutch oven, heat oil over medium high heat. Add onion and garlic. Saute until soft and transluscent, 5-10 minutes. Add celery and carrots. Season with salt and pepper. Saute until all the vegetables are soft, 5-10 minutes. Add tomatoes and bay leaves. Simmer uncovered on low heat for 1 hour or until thick. Remove bay leaves and check for seasoning. If sauce still tastes acidic, add unsalted butter, 1 tablespoon at a time, to round out the flavors.

I like a chunky sauce, so I stop here. If you want a smooth sauce, add 1/2 the sauce into the bowl of a food processor. Process until smooth. Continue with remaining tomato sauce.

If not using all the sauce, allow it to cool completely and pour 1 to 2 cup portions into freezer plastic bags or Tupperware. Keeps in freezer up to 6 months.

Yield: 6 cups